|
|
|
|
|
|
|
|
|
|
|
|
|
|
|
|
|
|
|
|
|
|
|
|
|
|
|
|
|
|
|
|
|
|
|
|
|
|
|
|
SAFETY NOTE: Please do not attempt to recreate the experiments shown on this
page unless you are familiar with High Voltage Safety Techniques
as well as Radiation Protection and Radiation Measurement!
|
|
|
|
|
|
|
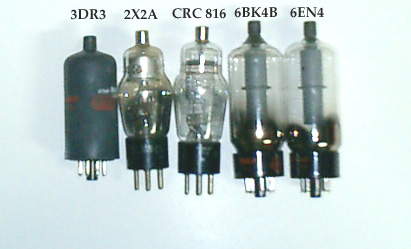
Have
you ever wanted an X-Ray machine of your own, but don't have the
$10,000+ to buy a commercial machine? This page will show you how to
build your own machine for less than $200! X-rays are created when
electrons are accelerated at high speed from the negative electrode
(cathode) of a vacuum tube and strike the positive electrode (anode)
inside the tube. Some vacuum tubes used in old radios, televisions, and
other antique electronic equipment will generate X-rays of surprising
intensity when a high voltage DC potential is placed across one of the
heater pins on the bottom and the anode on the top. To locate the
heater pins, use a multimeter. The heater pins will show a few ohms,
while the other pins will show infinite resistance (open). You can also
search the NJ7P Tube Database
for information about your tube.Tubes which work best in this
configuation are half-wave recitifier and beam triode types such as the
2X2A, 3DR3, 6BK4B, 6EN4, 15E and CRC 816. Testing here at Dangerous
Laboratories has shown that the 2X2A works best. We measured intensity
of the X-Rays as greater than 200 mR/hr which is the upper limit of our
Ludlum Model 3 survey meter with 44-7 geiger tube.The heater pins on
the 2X2A are pins 1 and 4. The other tubes mentioned seem to produce
arcing across the outside of the tube, which reduces X-Ray intensity. |
|
|
|
|
|
|
|
|
|
|
 |
|
|
|
|
|
|
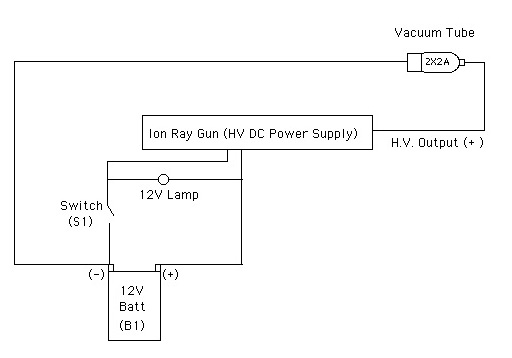
The first step is to locate a 2X2 tube. Fortunately, they are fairly common, and cost from $2.00 to $4.00. Antique Electronics Supply
is a good resource for these tubes. You will also need a high voltage
DC power supply capable of producing in excess of 40,000 volts. Some
experimenters have used a flyback transformer and several voltage
triplers found in old TV sets. I use the "Ion Ray Gun" available from Information Unlimited (part# IOG9K). This sells in kit form for about $130 and fully assembled for about $200. View the schematic for the IOG9K.
It is The ray gun is safe to use, and does not produce dangerous
shocks. It is highly recommended for those who might be new to high
voltage.
Get some alligator clips, a 12 volt lamp (part# 272-332), a
rocker switch (part# 275-694), battery holder (part# 270-407), and a 9V
type connector (part# 270-325) from Radio Shack. Don't forget the 8
"AA" batteries. You could skip the "AA" batteries, holder, and 9V-type
connector and use any 12 volt DC power source, alternatively. You will
also need some high voltage wire to connect the (+) High Voltage output
of the Ion Ray Gun to the anode of the tube. We use copper conductor
spark plug wire. Most auto parts stores sell spark plug wires as an
assembled set for a particular model of car, so they are expensive.
Furthermore, most of the newer wires are carbon conductor, which is
impossible to solder to. A better bet would be to check your local
junkyard for older cars and remove one from a junker. Make sure it is
copper core before you take it home. You will need about a foot. Save
the boots from the wires to use as insulators. Slide the boots on to
the section of wire with the open ends of the boots facing out towards
the wire ends and solder the clips onto the ends. You now have your
hookup wire.
An enclosure is necessary to protect the operator from the X-Rays! Never
energize a tube with high voltage without 1/4" lead shielding! If you
are anywhere close to the tube when it is energized, you run the risk
of getting severe radiation burns! Be sure to get some lead
sheet that is at least 1/4" thick to shield the tube. A metal toolbox
lined with lead makes an excellent and inexpensive enclosure. The
battery can be disconnected internally and the box padlock to prevent
accidents and unauthorized use.
|
|
|
|
|
|
|
|
|
|
 |
|
|
|
|
|
|
Before
building your machine make sure you have a geiger counter for measuring
the X-Rays. We recommend that you also wear an electronic type
dosimeter such as the Rad Scanner Model 500 available from Meter Conversions.
This unit fits in your shirt pocket and has an audible alarm that
sounds when radiation is detected. It also has a cumulative dose
feature.
Don't assume that your unit is not producing X-Rays just
because your geiger counter is not registering excess radiation! It is
best to treat your machine like a loaded gun and keep the aperture end
pointed away from you whenever the battery is connected. It is also advisable to keep the aperture covered with a sheet of lead when the unit is not in use.
|
|
|
|
|
|
|
|
|
|
|
|
|
|
|
|
 |
|
|
|
|
|
 |
|
|
|
|
|
|
|
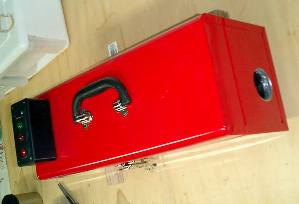
This
is the completed unit. We mounted the two switches and two lights in a
plastic project box affixed to the top of the toolbox. The switches are
hooked up in series as a redundant safety measure. A slide type switch
lights the green "armed" lamp and the rocker switch energizes the ion
ray gun and red "on" lamp. The above schematic shows only one switch,
but you can modify the switch configuration to suit your personal
tastes. |
|
|
|
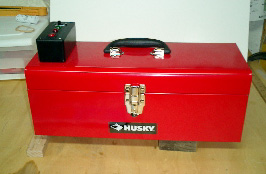
This
photo shows the front of the unit. The aperture is 2 inches in diameter
and was cut with a drill and hole saw. The front if the box is lined
with extra lead (except for the aperture) to reduce stray radiation. |
|
|
 |
 |
|
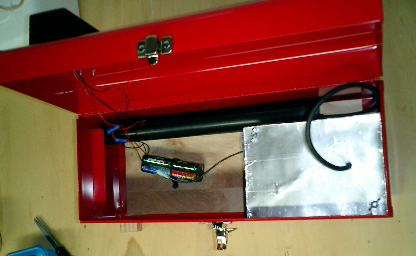
The
lid of the lead-lined box has been removed to show the vaccum tube. A
stainless steel hose clamp was attached to the anode terminal of the
2X2A tube, and the spark plug wire attached to it. The 18 gauge ground
wire is attached to one of the heater pins on the tube with an
alligator clip. The tube is mounted in a piece of styrofoam and secured
with plastic cable ties. The styrofoam is secured with velcro which
attaches it to the bottom of the lead lined box. The tube has been
moved away from the aperture for clarity. In operation, the tube is as
close to the aperature as possible, to ensure maximum X-Ray intensity
in front of the aperture. We were careful to ensure that the heater
pins and anode were not shorting on the inside of the box. |
|
|
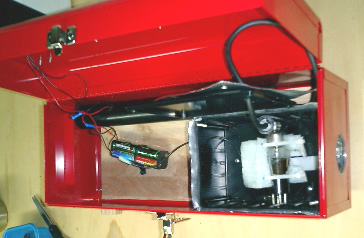
The
black tube inside the box is the Ion Ray Gun. You can see the spark
plug wire running from the Ion Ray Gun to the lead lined box which
holds the 2X2A tube. |
|
|
|
|
|
|
|
|
|
|
 |
|
|
|
|
|
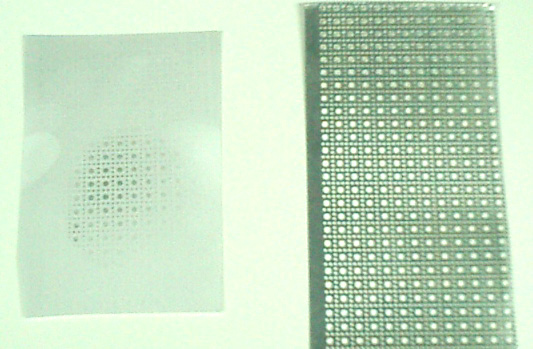
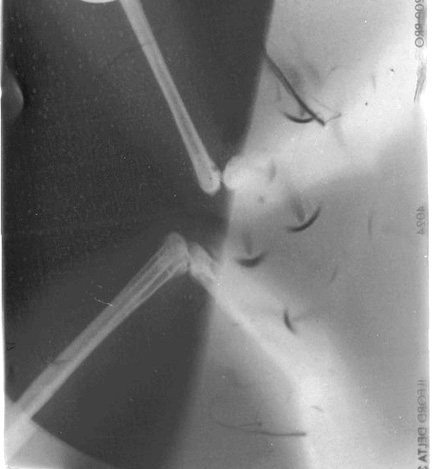
Now
that you have your X-Ray machine built, you will want to take some
pictures. You can use black and white photographic paper. Simply place
the object to be photographed between the aperture of the machine and
the photographic paper. This will have to be done in a darkroom with a
safelight, of course.This photo was taken at a distance of 1 cm from
the aperture of the machine. The aluminum screen was clamped to the
paper. The paper is standard Ilford paper. The exposure time was 40
seconds. You can see that the X-Rays did not penetrate the aluminum,
but did expose the paper through the holes. Further experiments with
the geiger counter have shown that the rays will penetrate .016 sheet
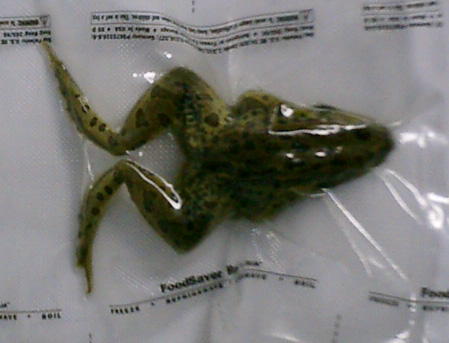
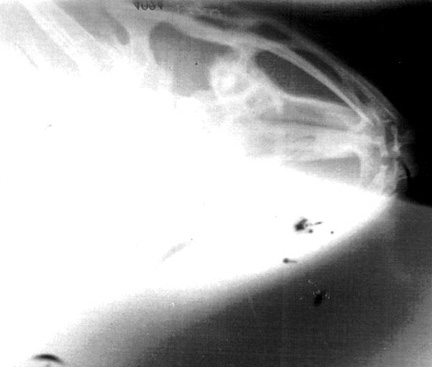
aluminum. Check out the X-Ray pictures of our preserved frog!
Commercial X-Ray tubes have a heated filament which produces a
greater number of electrons which consequently produce more X-Ray
intensity. We have found the opposite to be true with the 2X2A tube. We
hooked up a 1.5 volt battery to the heater pins of the tube and
energized the HV circuit. The intensity was actually less than with the
tube operating in "cold cathode" mode. This phenomenon has been
explained in a Bell Jar article
by another X-Ray experimenter, Bob Templeman, as follows: "Since the
tube is operated in a cold cathode mode, the tube's degree of vacuum is
quite important. Bob found that about one in eight tubes is able to
produce enough radiation to expose his film. One might ask 'why not
just heat the filament to get an assured, controlled emission of
x-rays?' The answer lies in the basic characteristics of a high vacuum
diode. A `normal' vacuum diode, such as a rectifier tube, operates in a
region where the tube current varies nearly linearly with the voltage
drop. Thus, substantial increases in current would be required to
produce a voltage drop across the tube significant enough to produce
useful levels of x-rays. For normal tubes, the current would be well in
excess of the tube's power rating. Normal operation for a rectifier
tube is moderate to high current with a low voltage drop.What is good
for rectifiers is not good for x-ray tubes. In the case of the x-ray
tube, the tube is operated in the upper part of the characteristic
curve, the 'saturation' region. In this mode, the voltage can be
increased with little increase of electron current. Getting the right
balance between current and voltage is part of each tube's design.
Also, as noted before, varying the filament temperature (e.g. by means
of varying the filament voltage) allows the intensity of the tube's
output to be adjusted. For each filament temperature, there is a
different current vs. voltage characteristic."
|
|
|
|
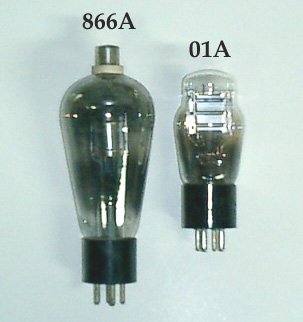
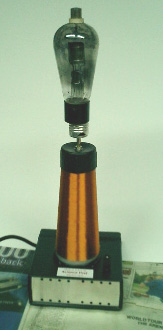
Another
interesting way to produce X-Rays is to simply place a tube on top of a
tesla coil. We have found two tubes that work for this: 01A and 866A.
The intensity of the X-Rays is much less than with the Ion Ray Gun.
NOTE - Radiation Danger: Do not stand anywhere near the tesla coil and
tube when the coil is energized!! |
|
|
|
|
|
|
|
 |
|
|
|
 |
|
|
|
|
|
|
|
|
|
|
|
|
|
Back to Main
|
|
|
|
|
|