The fluorescent bead test is probably the least expensive way to test for uranium or thorium in rock samples. It detects uranium in concentrations of less than .02%! The materials you will need are as follows:

1. Wooden Dowel (about 3/8" diameter)

2. At least 1 ounce sodium fluoride powder (This chemical is inexpensive and available from most chemical supply sources)

3. (2) inches of 20 Gauge Platinum wire (This item is available from a jewelry maker's supply store. At the time of this writing, this amount of wire cost $12 U.S.)

4. Propane or butane torch.

5. Mortar and pestle or other device for crushing rock samples

6. Ultraviolet lamp (blacklight)


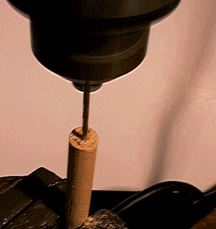
Cut off a 4 inch segment of the wooden dowel. Drill a small hole in one end of the segment.


Bend a small (1 cm) loop in one end of the wire. Flatten this loop out with a pair of "needlenose" pliers so it makes a tight 180 degree bend. Make another, larger loop in the other end of the wire. Do not flatten this loop. Insert the small loop into the hole in the dowel. Test the wire to make sure it will not come loose from the dowel. If it is loose, bend the small loop out slightly and re-insert into the dowel.


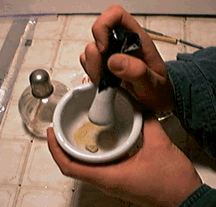
Crush the rock sample into powder. Only a small amount is required.


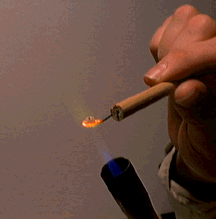
Heat the platinum wire with the torch until it is red hot. Immediately place the wire into the sodium fluoride. The fluoride should adhere to the wire. Heat the powder until it has melted. Repeat this procedure, adding more fluoride until you have a small bead on the wire loop. While the bead is still molten, dip it into the rock powder. A few grains should adhere to the bead. Re-heat this and repeat one or two more times. Only a few grains of rock powder will color the bead quite well.


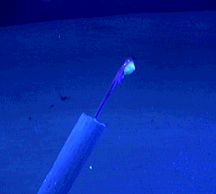
Allow the bead to cool. Turn off the lights in the room. This step must be done in darkness. Place the bead under the blacklight. If it fluoresces, chances are you have a uranium or thorium containing mineral or rock!


Tips for better results:

1. After checking the bead, remove it from the wire by placing the loop flat on a tabletop and lightly tapping it with the handle of a screwdriver or similar object. Hold the wire under the blacklight as before and brush the wire with a brass bristle brush until all material is gone. The loop is now ready for another sample.

2. Check to see if a rock is fluorescent before you crush it by placing it under a blacklight. Some rocks and minerals, both radioactive and non-radioactive, are naturally fluorescent. This test is not effective with these types of rocks.

3. The test is most effective with radioactive minerals that don't normally fluoresce under a blacklight. It is best to double-check this method with another type of analysis such as a geiger counter, spinthariscope, or chemical analysis before assuming it is radioactive. The bead test is most effective with samples that contain a very low amount of radioactive material which would be difficult to separate from background radiation with a geiger counter. It is also very handy for determining which minerals within a "mixed" radioactive rock contain the most uranium or thorium. The intensity of the fluorescence is proportional to the uranium or thorium content.

4. Please note that some inexpensive bulbs being sold as "blacklight" bulbs are not really ultraviolet and will not work. A safe bet is to buy an ultraviolet "mineral lamp" from a rock shop. A portable battery-opeated model is handy to take into the field.


Return To Main
onal to the uranium or thorium content.

4. Please note that some inexpensive bulbs being sold as "blacklight" bulbs are not really ultraviolet and will not work. A safe bet is to buy an ultraviolet "mineral lamp" from a rock shop. A portable battery-opeated model is handy to take into the field.


Return To Main

ock shop. A portable battery-opeated model is handy to take into the field. ------------------------------------------------------------------------ Return To Main