Here's how to build a "monotube" boiler for your generator:
Most of the materials can be ordered from "MSC Industrial Supply".
The number for MSC is 1-800-645-7270. Get a catalog! They mainly sell to businesses, so if you don't already have a business, come up with one before calling! Your local hardware store may have some parts, but as far as heavy duty pipe (class 300) and tube (K), and stainless fittings, forget it!.
It all starts with about 50 feet of schedule "K" heavy duty
copper coil (3/8" outside diameter). Use a "spring tubing bender" to wind it into concentric stacked coils. In other words, start winding out coil until it is about 10" in diameter and then start winding in to a smaller coil that is situated directly on top of it. A center hole in the coil stack of about 3" is good. It might not be a bad idea to use a 3" cylinder as a form to wind around
The next step is to get a 2" Malleable iron Extra heavy duty (class 300) pipe tee. You will need a 2" to 3/4" reducer for the top of the tee, and 2" to 1/2" reducers for the side and bottom holes. Use a generous amount of Gasoila pipe thread sealant on all the threads, and tighten the reducers with LOTS of force. Do not use teflon tape inside the boiler, as it will burn and leak. Get a LARGE pipe wrench and a heavy, securely mounted vise to aid you in this task. It is critical that you tighten the reducers all the way at this point, or you will have a leaky boiler. Screw in the 3/4" top pipe (steam out). Screw in the side elbow and the 1/2" MPT to 1/2" flare brass fitting on the side, (Note: I had some problems with leakage here. If you can figure out how to keep this steam-tight, you will have a great boiler!) and a 1/2" to 1/4" reducer on the bottom now. Don't forget the sealant! Insert a 1/2" flare nut on the coil, and flare the end. Slip the coil over the top of the tee and the 3/4" pipe and atttach the flare to the brass fitting on the side.
It is time to to make a drain for the tee. This is essential for checking the boiler's water level, removing excess water, and reducing pressure so the boiler can be filled with a pump before it is fired. Now screw a STAINLESS 1/4" to 1/8" reducer into the bottom of the tee. Attach a stainless 1/8" street elbow to the reducer, then a (1/8") 4" stainless pipe to the elbow. On the end of this pipe, attach another stainless elbow, and a 1/8" MPT to 1/4" flare. Flare a 5" piece of 1/4" copper tubing and attach it to the flare fitting. Use a brass needle valve attached to the end of the tubing to complete the drain.
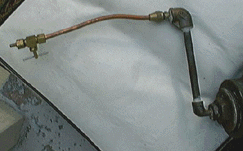
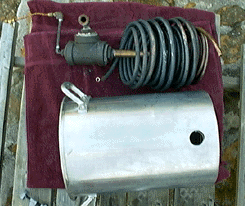
Boiler Fig. 1
Here is a shot of the disassembled boiler. You can see the coil (not yet flared or connected) wrapped around the "steam out pipe" . When the coil is connected, and held upright in its proper position, it rests on the tee at the point of the 1/2" elbow on the side. There is enough play in the coils so that when they heat up and cool down, they don't bind themselves. The only thing not pictured is the 1/2" MPT to 1/2" flare brass fitting that would be screwed into the 1/2" black elbow (you can see the opening in this elbow near the top of the photo).
Now it's time to fabricate the boiler liner. IMPORTANT: The boiler liner should be a couple of inches greater in diameter than your copper coils, otherwise you won't be able to assemble the boiler. Bend a stainless sheet into a cylinder using a sheet metal bender. Cut a 12" diameter circle out of the stainless sheet. Clamp or tape the circle on the end of the cylinder as a guide and weld the open seam on the side of the cylinder shut. Weld the circle on to the top of the cylinder. Now, using a hole saw, jigsaw, plasma cutting torch, or whatever, make two 1 1/2" holes in the top of the cylinder. One will be for the smokestack, the other for the "steam out" pipe. You should also make a 1" diameter hole in the side of the liner (about 2 1/2" from the top) for the "water in" side of the copper coil. Now match the completed cylinder with the inside of your aluminium pot using a 1" spacer between the top of the steel cylinder and the top of the inside of the aluminum pot (this space will need be filled with insulation later). Draw circles through the cut out holes in the cylinder on the inside of the pot, and remove the cylinder. Now cut out the holes in the pot (with a hole saw, this part is easy because you can punch holes on the inside of the pot, centered on the circles. This way, you can turn the pot over and use your hole saw on the outside top of the pot). Stuff the top inside of the pot with fiberglass insulation (I like the new Owens Corning low-itch variety), and reinsert the cylinder. Insert 1 1/2" pipes in the top holes to keep the cylinder from rotating and start stuffing the space between the cylinder and the pot with insulation. Use a wood slat to compress it. Once you are about 2" from stuffing it full, insert a generous amount of aluminium foil in the space to keep the insulation from falling out. Use a length of copper tubing shaped into a circle and stuffed into the circular space to keep the foil in.
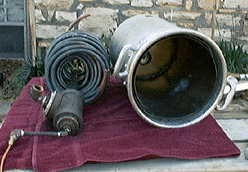
Boiler Fig. 2
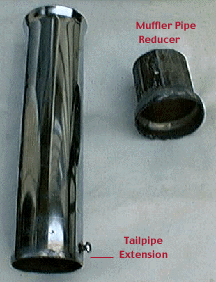
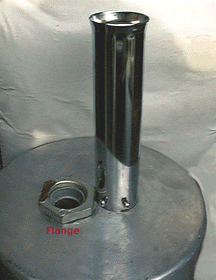
Now insert a flange in the top of the cylinder and screw it tight to the pot. Insert a muffler pipe reducer (available at an auto parts store) into the other hole (you may have to cut it to fit). Now you are ready to insert the coils and the 2" tee (which should be connected by now). Fit the top of the coil ("water in" side) through the side hole, and the "steam out" pipe through the top hole (flange), Make sure the coil sticks out of the side of the boiler a least 4". At this point, you can flare the end of the coil that sticks out of the side of the boiler shell. Attach this to a (1/2" flare to 3/8 MPT) fitting that is connected to a bronze 3/8" check valve. This is the point for your water in. Make sure that the arrow on the check valve is pointing towards the boiler! Here you may elect to put a 3/8" tee on the supply side of the check valve.
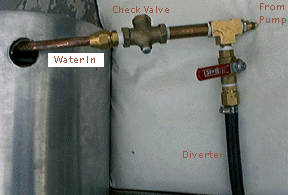
You can then put a valve here to divert water from entering the coil. Do this by running a hose back to your non-pressurized water tank to recirculate the water. This is done so that if your pump is overfeeding the boiler, you can open up the "diverter valve" and correct the problem.
Attach the elbow on the "steam out" pipe which should be protruding through the (flange) hole in the top (you can use teflon tape here and on all the rest of the pipe fittings from here on out because they are outside the boiler shell and therefore will not burn). Now you can screw a 3/4" pipe to the elbow
so that the end of the pipe projects horizontally from the top of the pot about 3-5". Now attach a 3/4" tee to this.
IMPORTANT NOTE ABOUT SAFETY VALVES
The safety valve is the most important part of the boiler! Be sure to use a Conbraco High Pressure Steam Bronze Safety Valve! The MSC catalog number is 37012705 The Manufacturer's number (Conbraco, Inc.) is 19-302-30 This particular valve is set to release at 125 psi. It might seem fairly expensive ($ 100.00), but this is not the place to cut costs! You WILL run into a situation where the boiler isn't getting enough water, which causes the coils to become red hot. When any amount of water is introduced into the boiler, the pressure immediately shoots up to dangerous levels! This could cause metal parts to explode and superheated steam to burn you to death IF YOU DON'T HAVE THE RIGHT VALVE. Most people at hardware stores or even heating and cooling places will have NO CLUE what this particular valve is all about. Don't let someone talk you into a water relief valve or some 15 psi boiler relief valve.
You must make sure that there are no shutoffs or other obstructions which would impede the operation of this valve. The steam should travel from the 2" black tee straight to the safety Valve. It is a good idea to occasionally test the operation of the valve by pulling up on the test lever. Wear gloves, as it will release steam from two separate ports. Do not test it all of the time, as the spring inside will wear out.
On the top will go your Steam Pressure Safety Valve.
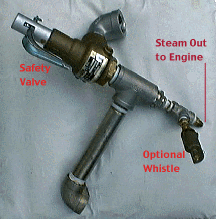
Attach a 3/4" to 1/2" reducer to the bottom of this tee, and then attach your (1/2" Male Pipe Thread to 1/4" male flare) fitting on the bottom of the 3/4" tee. At this point, attach a chrome tailpipe extension (auto parts store) to the part of the muffler pipe reducer that protrudes out of the top of the boiler.
You are now ready to Boil!
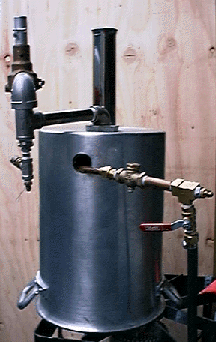
The completed project...
Return To Main
Return to Generator


